
2.5. Networking in Virtual Machines or Docker
Potential Restrictions
Attention
Due to an abundance of OS virtualization options, we at Elecard cannot test and guarantee the probe’s operation under every virtual solution. If necessary, contact our technical support team.
A probe inside a virtual machine (VM) works pretty much the same way it does on real hardware. Still, it is important to keep in mind that abstractions on top of hardware can lead to guest system’s inefficient performance. This in turn could potentially lead to the following issues:
Decrease of max traffic received without packet loss;
Distortion of HTTP connection timing measurements, skewing the metrics upward;
Pcap-related measurements may be unreliable: these include Ethernet IAT and MLR parameters as well as stream sniffing and pcap recording tasks;
Probe will not be able to use hardware timestamping for received Ethernet packets.
To avoid these issues, be sure not to work through virtual interfaces—at least when it comes to UDP/IPTV-based monitoring. Below you will find how to reduce the level of network device abstraction in VMs and Docker containers.
Networking in VMs
PCI Passthrough
VMs support a technology known as PCI passthrough that lets you directly access a physical PCI device such as the network interface controller (NIC). This solution increases network performance since the NIC, powered by a native driver, is installed in a guest OS.
Requirements:
Hardware-level support: CPU has to support the IOMMU technology (Intel VT-d or AMD-Vi) that additionally has to be enabled in BIOS/UEFI.
Kernel-level Linux support: host system’s kernel has to be compiled with IOMMU support in mind.
VFIO driver: host system has to contain a vfio-pci driver. At guest system’s launch, vfio-pci driver is assigned to a physical device in the host system instead of the default one.
You can find the required PCI device’s ID via the lspci utility:
[root@localhost ~]# lspci -nn
...
00:1f.5 Serial bus controller [0c80]: Intel Corporation Tiger Lake-H SPI Controller [8086:43a4] (rev 11)
00:1f.6 Ethernet controller [0200]: Intel Corporation Ethernet Connection (14) I219-V [8086:15fa] (rev 11)
01:00.0 Ethernet controller [0200]: Intel Corporation 82574L Gigabit Network Connection [8086:10d3]
Let’s take a quick look on how NIC passthrough works in Virtual Machine Manager GUI.
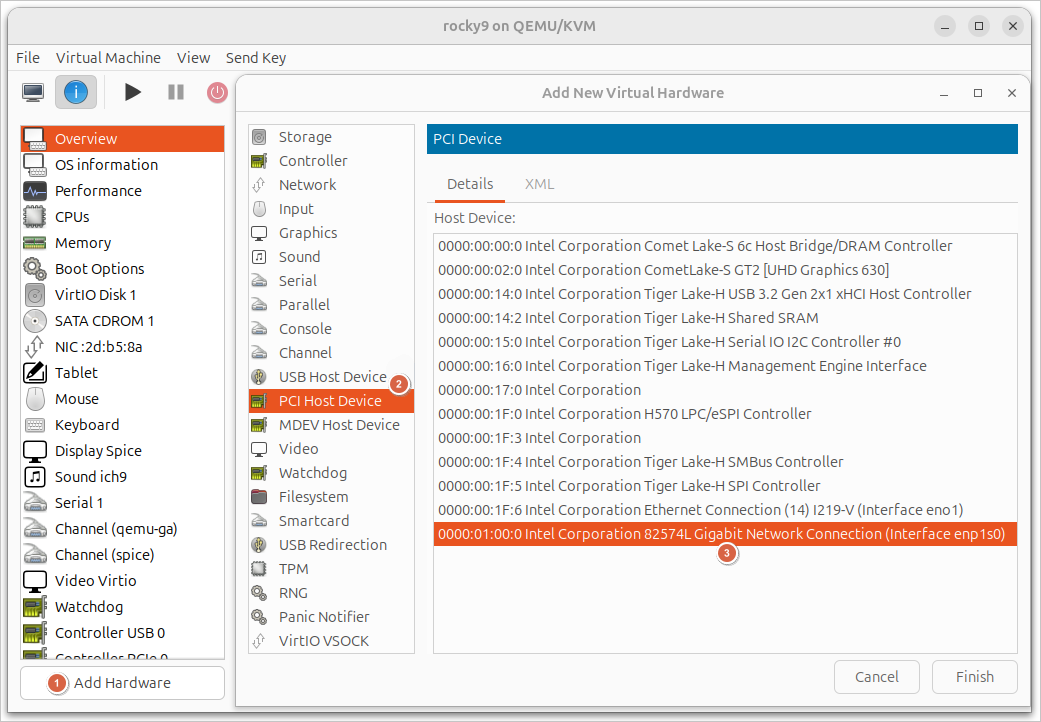
Double-click to open your VM’s properties and access the Show virtual hardware details tab. Then, click on Add Hardware in the window’s lower part.
Click on PCI Host Device in the menu of available hardware.
In the PCI Device list, select the required controller and click Finish. The controller’s description should contain the PCI device ID and may also contain the interface name in the host system.
If the VM was launched, restart it to make sure the changes apply correctly.
Once the VM starts up, the system driver should be automatically assigned to the NIC in the guest system:
[root@localhost ~]# lspci -k
...
07:00.0 Ethernet controller: Intel Corporation 82574L Gigabit Network Connection
   Subsystem: Intel Corporation Gigabit CT Desktop Adapter
   Kernel driver in use: e1000e
   Kernel modules: e1000e
In turn, the host system’s driver should switch to vfio-pci:
[root@localhost ~]# lspci -k
...
01:00.0 Ethernet controller: Intel Corporation 82574L Gigabit Network Connection
   Subsystem: Intel Corporation Gigabit CT Desktop Adapter
   Kernel driver in use: vfio-pci
   Kernel modules: e1000e
To achieve best performance, double-check that the guest system has interrupt balancing enabled.
SR-IOV Virtual Functions
Note
The following section gives the technology’s description only. To learn more, follow your OS distribution and hypervisor documentation.
It is also worth noting that there exists a virtualization technology called SR-IOV (Single Root I/O Virtualization) that allows a single physical PCIe device to appear as multiple separate logical devices to a host system. SR-IOV is commonly used for NIC virtualization, breaking down a physical controller into multiple virtual ones that a VM has direct access to. This improves network subsystem performance in virtual environments since VMs gain direct access to hardware resources, bypassing hypervisor emulation.
Requirements:
Hardware-level CPU support: CPU has to support the IOMMU (Intel VT-d or AMD-Vi) technology that also has to be enabled in BIOS/UEFI.
Hardware-level NIC support: NIC has to support the SR-IOV Virtual Functions technology that has to be enabled in BIOS/UEFI, too. This setting could be global or linked to a specific device.
The technology lets you manage both untagged and tagged traffic in the physical port.
Networking in Docker
Note
At the time of this writing, Boro probes are not distributed in the Docker. This section’s aim is to only share recommendations on how to manage the Docker networking stack, not how to create a Docker image with a probe built in.
Launching a probe in a container does not increase CPU workload too much, especially if you rely on light-weight containers. Still, a container by default employs Network Address Translation (NAT), which could lead to the following probe-related issues:
Without extra Docker-related configuring, a probe cannot receive multicast streams;
Additionally, a probe cannot be a receiver of unicast stream (UDP unicast, SRT listener mode);
Restrictions: decreased network performance and potential inaccuracies in measuring Ethernet parameters.
If there’s no way other than to launch a probe in a container for you, consider host and macvlan network operation modes—they let you manage network devices directly.
Host Network Driver
In the host network mode, the Docker network stack is no longer isolated from the host system (i.e., the host system’s namespace shall be used). This means that all interfaces attached to the host system are available for in-container use. Consequentially, the container doesn’t get its own IP address allocated, and applications will be bound to the host system’s interfaces.
We recommend this approach in case you plan on launching a probe on a server administered by a Linux distribution that employs glibc older than the version required for probe’s operation.
Restrictions
hostnetwork mode supported in Linux-based Docker Engine only;Not compatible with Enhanced Container Isolation;
Docker Desktop should be no older than version 4.34.
Commands
Create and launch the container:
docker run \
  --detach --interactive --tty \
  --privileged \
  --network host \
  ubuntu:24.04
--detach --interactive --tty flags are used as an example, so the container continues working in the background.
For the probe to work properly, you have to escalate privileges by setting the flag --privileged.
This way, the probe’s pcap process will be able to measure Ethernet parameters and create pcap records.
The --network host flag specifies the use of network in host mode.
Probe Launch Example
The following example shows in-container Boro probe launch on ubuntu:24.04.
What makes this example stand out is that the application is located in the file system of the host machine:
docker run \
  --detach --privileged --init \
  --restart always \
  --network host \
  --volume /opt/elecard/boro/dev/:/opt/elecard/boro/dev:z \
  --name 'probe_dev' \
  ubuntu:24.04 \
  /opt/elecard/boro/dev/streamMonitor
--restart always flag specifies that the container will be launched regardless of its current state in case the OS restarts.
--volume /opt/elecard/boro/dev/:/opt/elecard/boro/dev:z string mounts the probe catalog into the container at the specified path.
This way, the probe’s records and configuration files will be saved in case the container restarts.
--name 'probe_dev' flag assign’s the container its name.
/opt/elecard/boro/dev/streamMonitor string showcases the full path to the probe’s application that will be launched once the container starts up.
Macvlan Network Driver
Macvlan Network Docker driver lets you assign unique MAC and IP addresses for each container, making it possible to map a host device’s dedicated NIC directly to the container (avoiding the regular NAT connection). Note that when various macvlan networks are in use, containers retain their L2-level network isolation; plus, an additional isolation between the container and host system is established.
This approach is well-suited for running a probe due to the:
container retaining its isolation;
container getting direct access to the NIC;
probe getting assigned a dedicated NIC for data receipt.
Still, with all the advantages in mind, there’s an issue regarding probe and server connectivity. The above-mentioned container-to-host isolation doesn’t provide connection via the host machine’s network interfaces. Plus, in certain networks, using the data port for management purpose is unwelcome and even unacceptable (management traffic must not mix with analyzed traffic, especially in case of UDP/IPTV-based monitoring). That’s where Docker lets us create the second network in the default bridge mode for the probe to establish a connection with the Internet or host device.
For the probe’s pcap process to be able to measure Ethernet parameters and create pcap records, use the --privileged flag while running the container.
Restrictions
macvlannetworking mode supported in Linux-based Docker Engine only;Most cloud service providers block macvlan;
Linux kernel no older than version 3.9 required. Version 4.0 and later are recommended;
Macvlan not supported in rootless mode.
Commands
No IP assigned
Launching a container without assigning macvlan network parameters (in this case, Docker itself will configure the network, which is enough for multicast receipt):
Create a macvlan network:
docker network create -d macvlan \
  -o parent=enp1s0 test_net
-o parent=<iface>parameter specifies the parent interface on the host device for the probe to receive to-be-analyzed data from.Create a regular bridge-type network for connecting the Boro probe to the Boro server:
docker network create -d bridge server_bridge
Ensure the networks were created successfully:
[root@localhost ~]# docker network ls
NETWORK ID     NAME            DRIVER    SCOPE
a08c4253f05d   bridge          bridge    local
1cf9579b7bda   host            host      local
3e29a74817b7   none            null      local
b1a5271069ae   server_bridge   bridge    local
1c7c2a831d63   test_net        macvlan   local
Create and launch the container in the background mode using two networks:
--network test_net—macvlan for receiving to-be-analyzed data,--network server_bridge—bridge for maintaining probe-to-server communication:docker run \ --detach --interactive --tty \ --privileged \ --network test_net \ --network server_bridge \ ubuntu:24.04
--detach --interactive --ttyflags are used as an example, so the container continues working in the background.Find the launched container’s ID and double-check the network’s state:
[root@localhost ~]# docker ps
CONTAINER ID   IMAGE          COMMAND                  CREATED       STATUS       PORTS           NAMES
0ec0537c0f40   ubuntu:24.04   "/bin/bash"              2 hours ago   Up 2 hours                   relaxed_euler
[root@localhost ~]# docker container inspect 0ec0537c0f40
...
   "Networks": {
      "server_bridge": {
         "MacAddress": "02:42:ac:13:00:02",
         "Gateway": "172.19.0.1",
         "IPAddress": "172.19.0.2",
         "IPPrefixLen": 16,
         "IPv6Gateway": "",
         "GlobalIPv6Address": "",
         "GlobalIPv6PrefixLen": 0,
         ...
      },
      "test_net": {
         "MacAddress": "02:42:ac:12:00:02",
         "Gateway": "172.18.0.1",
         "IPAddress": "172.18.0.2",
         "IPPrefixLen": 16,
         "IPv6Gateway": "",
         "GlobalIPv6Address": "",
         "GlobalIPv6PrefixLen": 0,
         ...
      }
   }
Assigned IP
Launching a container with assigned IP address for the macvlan network:
Create a macvlan network:
docker network create -d macvlan \
  --subnet=192.168.1.0/24 \
  --gateway=192.168.1.1 \
  -o parent=enp1s0 test_net
Specify
subnetandgatewaycorresponding to your network.-o parent=<iface>parameter specifies the parent interface on the host device for the probe to receive to-be-analyzed data from.Create a regular bridge-type network for connecting the Boro probe to the Boro server:
docker network create -d bridge server_bridge
Ensure the networks were created successfully:
[root@localhost ~]# docker network ls
NETWORK ID     NAME            DRIVER    SCOPE
a08c4253f05d   bridge          bridge    local
1cf9579b7bda   host            host      local
3e29a74817b7   none            null      local
1d1a25aec471   server_bridge   bridge    local
606796c2d96d   test_net        macvlan   local
Create and launch the container in the background mode using two networks:
--network test_net—macvlan for receiving to-be-analyzed data,--network server_bridge—bridge for maintaining probe-to-server communication:docker run \ --detach --interactive --tty \ --privileged \ --network test_net --ip=192.168.1.111 \ --network server_bridge \ ubuntu:24.04
--detach --interactive --ttyflags are used as an example, so the container continues working in the background.--network test_net --ip=192.168.1.111string enables you to select a network and specify the IP address.Find the launched container’s ID and double-check the network’s state:
[root@localhost ~]# docker ps
CONTAINER ID   IMAGE          COMMAND                  CREATED       STATUS       PORTS           NAMES
b31a36f1ffbe   ubuntu:24.04   "/bin/bash"              1 hours ago   Up 1 hours                   fervent_nightingale
[root@localhost ~]# docker container inspect b31a36f1ffbe
...
   "Networks": {
      "server_bridge": {
         "MacAddress": "02:42:ac:12:00:02",
         "Gateway": "172.18.0.1",
         "IPAddress": "172.18.0.2",
         "IPPrefixLen": 16,
         "IPv6Gateway": "",
         "GlobalIPv6Address": "",
         "GlobalIPv6PrefixLen": 0,
         ...
      },
      "test_net": {
         "IPAMConfig": {
            "IPv4Address": "192.168.1.111"
         },
         "MacAddress": "02:42:c0:a8:01:6f",
         "Gateway": "192.168.1.1",
         "IPAddress": "192.168.1.111",
         "IPPrefixLen": 24,
         "IPv6Gateway": "",
         "GlobalIPv6Address": "",
         "GlobalIPv6PrefixLen": 0,
         ...
      }
   }
IP Pool
Launching a container with specified IP address pool. The pool will be used to assign an IP address to the macvlan network:
Create the macvlan network:
docker network create -d macvlan \
  --subnet=192.168.1.0/24 \
  --gateway=192.168.1.1 \
  --ip-range=192.168.1.128/25 \
  --aux-address="my_pc=192.168.1.128" \
  --aux-address="my_router=192.168.1.129" \
  -o parent=enp1s0 test_net
Specify
subnetandgatewaycorresponding to your network. Optionally, you can also assign a pool of available IP addresses viaip-rangeand exclude reserved IP addresses viaaux-address.-o parent=<iface>parameter specifies the parent interface on the host device for the probe to receive to-be-analyzed data from.Create a regular bridge-type network for connecting the Boro probe to the Boro server:
docker network create -d bridge server_bridge
Ensure the networks were created successfully:
[root@localhost ~]# docker network ls
NETWORK ID     NAME            DRIVER    SCOPE
a08c4253f05d   bridge          bridge    local
1cf9579b7bda   host            host      local
3e29a74817b7   none            null      local
d5cee5a1fcfc   server_bridge   bridge    local
46123a9a0492   test_net        macvlan   local
Create and launch the container in the background mode using two networks:
--network test_net—macvlan for receiving to-be-analyzed data,--network server_bridge—bridge for maintaining probe-to-server communication:docker run \ --detach --interactive --tty \ --privileged \ --network test_net \ --network server_bridge \ ubuntu:24.04
--detach --interactive --ttyflags are used as an example, so the container continues working in the background.
Find the launched container’s ID and double-check the network’s state:
[root@localhost ~]# docker ps
CONTAINER ID   IMAGE          COMMAND                  CREATED       STATUS       PORTS           NAMES
9464442ea8a5   ubuntu:24.04   "/bin/bash"              1 hours ago   Up 1 hours                   kind_antonelli
[root@localhost ~]# docker container inspect 9464442ea8a5
...
   "Networks": {
      "server_bridge": {
         "MacAddress": "02:42:ac:12:00:02",
         "Gateway": "172.18.0.1",
         "IPAddress": "172.18.0.2",
         "IPPrefixLen": 16,
         "IPv6Gateway": "",
         "GlobalIPv6Address": "",
         "GlobalIPv6PrefixLen": 0,
         ...
      },
      "test_net": {
         "MacAddress": "02:42:c0:a8:01:82",
         "Gateway": "192.168.1.1",
         "IPAddress": "192.168.1.130",
         "IPPrefixLen": 24,
         "IPv6Gateway": "",
         "GlobalIPv6Address": "",
         "GlobalIPv6PrefixLen": 0,
         ...
      }
   }
Probe Launch Example
docker run \
  --detach --privileged --init \
  --restart always \
  --network test_net \
  --network server_bridge \
  --volume /opt/elecard/boro/dev/:/opt/elecard/boro/dev:z \
  --name 'probe_dev' \
  ubuntu:24.04 \
  /opt/elecard/boro/dev/streamMonitor
This example is similar to the one described in the previous section, except for network management: --network test_net—adds the macvlan network for receiving to-be-analyzed data; --network server_bridge—adds a network for probe-to-server communication.